August 4, 2010 by Jessica Zorawski
In the last decade, CRM, a.k.a. Customer Relationship Management, has become a keyword for organizations, especially as competition increases and understanding your consumer becomes more important. Most businesses have some sort of database that collects information ranging from customer name to birth date to shopping patterns. In this post, you’ll find information on how to integrate your current CRM system with Opt It Mobile 3.0, or, if you’re in need of a CRM solution, how to create your first CRM system within Opt It.
If you already have a CRM database created, you can link the system to Opt It through our API. Check out: http://app.optitmobile.com/help/developers-api-overview for details on how to get this set up. Depending on the CRM system you are using, you will need to get a developer involved to integrate the two systems. Some CRM systems, unless they are open source or have an API, will not allow you to integrate them. For those of you who have a CRM system that can be integrated, the multitude of options created by linking your CRM system to your Opt It account depends on how much information you have for each of your customers and what you’re trying to accomplish. Some examples of expanded capabilities include the ability to add members from your current system, the ability to insert member’s names in a personalized message, and the ability to send out a special birthday offer.
CRM Features in Action:
Joe is your customer and you know the following information: he has purchased product X multiple times before at location Y and his birthday is today. Consider sending him this message: “Hey Joe- Happy birthday! Stop by location Y & receive “buy one get one free” product X!” The chance of Joe responding to this highly personalized offer is very high.
If you don’t currently have a CRM database of your customers, you can begin creating one within your Opt It account. Use the web sign up form widget to capture pertinent customer demographic information like name, email, zip code, and birth date. You can also ask your members to reply to a message with demographic information. An example of such a message: “Please reply KEYWORD name, birth date, zip code”
By customizing your messages for your consumers, you’ are creating a personalized and closely targeted offer that is much more likely to be acted upon. Get started today!
August 2, 2010 by Jessica Zorawski
Now that you’re well versed on what a sub-keyword is and how to use it as a Subscription, we will continue our miniseries with detailed instructions on how to manage a sub-keyword type Contest.
Contest
Choosing the sub-keyword type Contest will provide you with a multitude of options to completely automate the Contest process.

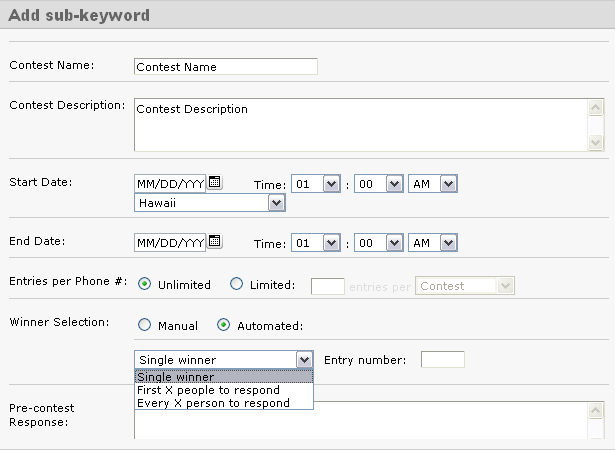
Start by giving the Contest a name and description. This is solely for internal purposes and will help you utilize our reporting tools later on.
You can set the Start and End dates for your Contest, down to the minute. There is a setting to adjust time zones as well.
Next, chose the number of Entries per Phone you want admitted into the contest. Then, chose whether you want the Winner Selection to be Manual or Automated. If you select Automated, you can choose to have multiple winners. If you choose the Manual selection option, you can manually select the winner from the poll of available entrants.
The next five fields are the Pre-Contest response, Post-Contest response, General/Losing response, Winning response, and Already Entered response messages. All of these messages, if left blank, will not be sent out. However, it’s in your best interest to fill in at least some of these, especially if people will be joining your list for the first time so that they receive some sort of confirmation that they text in properly.
The language you use within these messages is up to you, however, we’d like to suggest some potential language that has worked well for others:
Pre-Contest Message
“Thank you for joining the ___ contest! We will notify you with the results shortly.”
*If a person texting in is NOT yet a member of the keyword, texting in for the contest does not add them to your keyword list. Consider offering them a way to join by adding “Reply [YOUR KEYWORD] to receive future promos & coupons”. This line can be added to any or all of the messages.
Post-Contest Message
“Thank you for participating in the ___ contest. Check back with us regularly as we love offering savings and coupons to our loyal customers!”
General/Losing Response
“Thanks for being a part of our __ contest. Unfortunately, you did not win this time, but feel free to try again next time!”
Winning Response
“Congrats- You WON!!!! Come to ____ & redeem your reward!”
Already Entered Response
“Thanks for texting in, but you are already entered in to this contest. We’ll notify you soon regarding the results!”
Last but not least, hit Save. Create awareness for your contest through your advertising and employees and sit back while Opt It Mobile 3.0 takes care of the contest!
Check back tomorrow for information on the Forward and Response type sub-keywords.
July 22, 2010 by Jessica Zorawski
Once you’ve got a basic understanding of our software, your focus will most likely turn to getting the most out of each message you send. If you’ve been a client with us for awhile now, or if you are just getting started with Opt It, you will definitely want to read about this cool new feature offered in Opt It 3.0.
We’ve been in the text messaging business since 2004 and know from experience that one of the key ways to grab your clients’ attention via text is to customize the message to make it time sensitive. This is where the Dynamic Expiration Date comes in- it’s a simple and easy way to catch seize your client’s attention and motivate them to act immediately upon an offer.
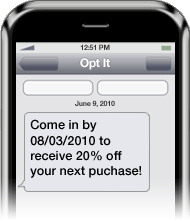
Here’s how it works: The Dynamic Expiration Date allows Opt It users to set their coupons or offer to expire an “X” amount of days after a message is sent out. For example, if your customer signs up for your list on 06/01/2010, your Welcome Message might include a coupon that expires in 3 days. For your customers that receive this message, the text would say “please redeem by 06/04/2010”. But if this person joined on 06/02/2010, the message would read to them “please redeem by 06/05/2010”. Pretty cool, huh?
The benefits of this feature are huge- not only are you sending a customized message to your members to make them feel special, you’re setting a timeline for redemption, forcing those who want to take advantage of the deal to act quickly.
So, how do you use it? It’s easy:
All you have to do is include into your message to have your offer expire an X number of days after the member joins the list (Just change XX to the number of days you want the offer to be valid). Remember- the number needs to be at least 2 digits, so if you want people to redeem your offer 1-9 days in the future, just include a “0” before the number of choice.
An example message would look like this:

(This is how the message looks typed in the software)

(This is how the message appears on the members phone)
The Dynamic Expiration Date feature can be included in your Welcome Message, Response Message, Already Subscribed Message, Web Form Verification Message, and Subscription Forward Response Message.
And the best part of the feature? – Iit’s FREE!


